We currently live in a starter flat with all sorts of problems. Namely among them for the winter season are drafty windows and doors. As a crocheter, I decided to make a door draft snake for our patio door to help block a lot of the draft. As you can tell from the rather said sketches below, I’m not an artist, but rather, I had a vague plan that I turned into something solid.
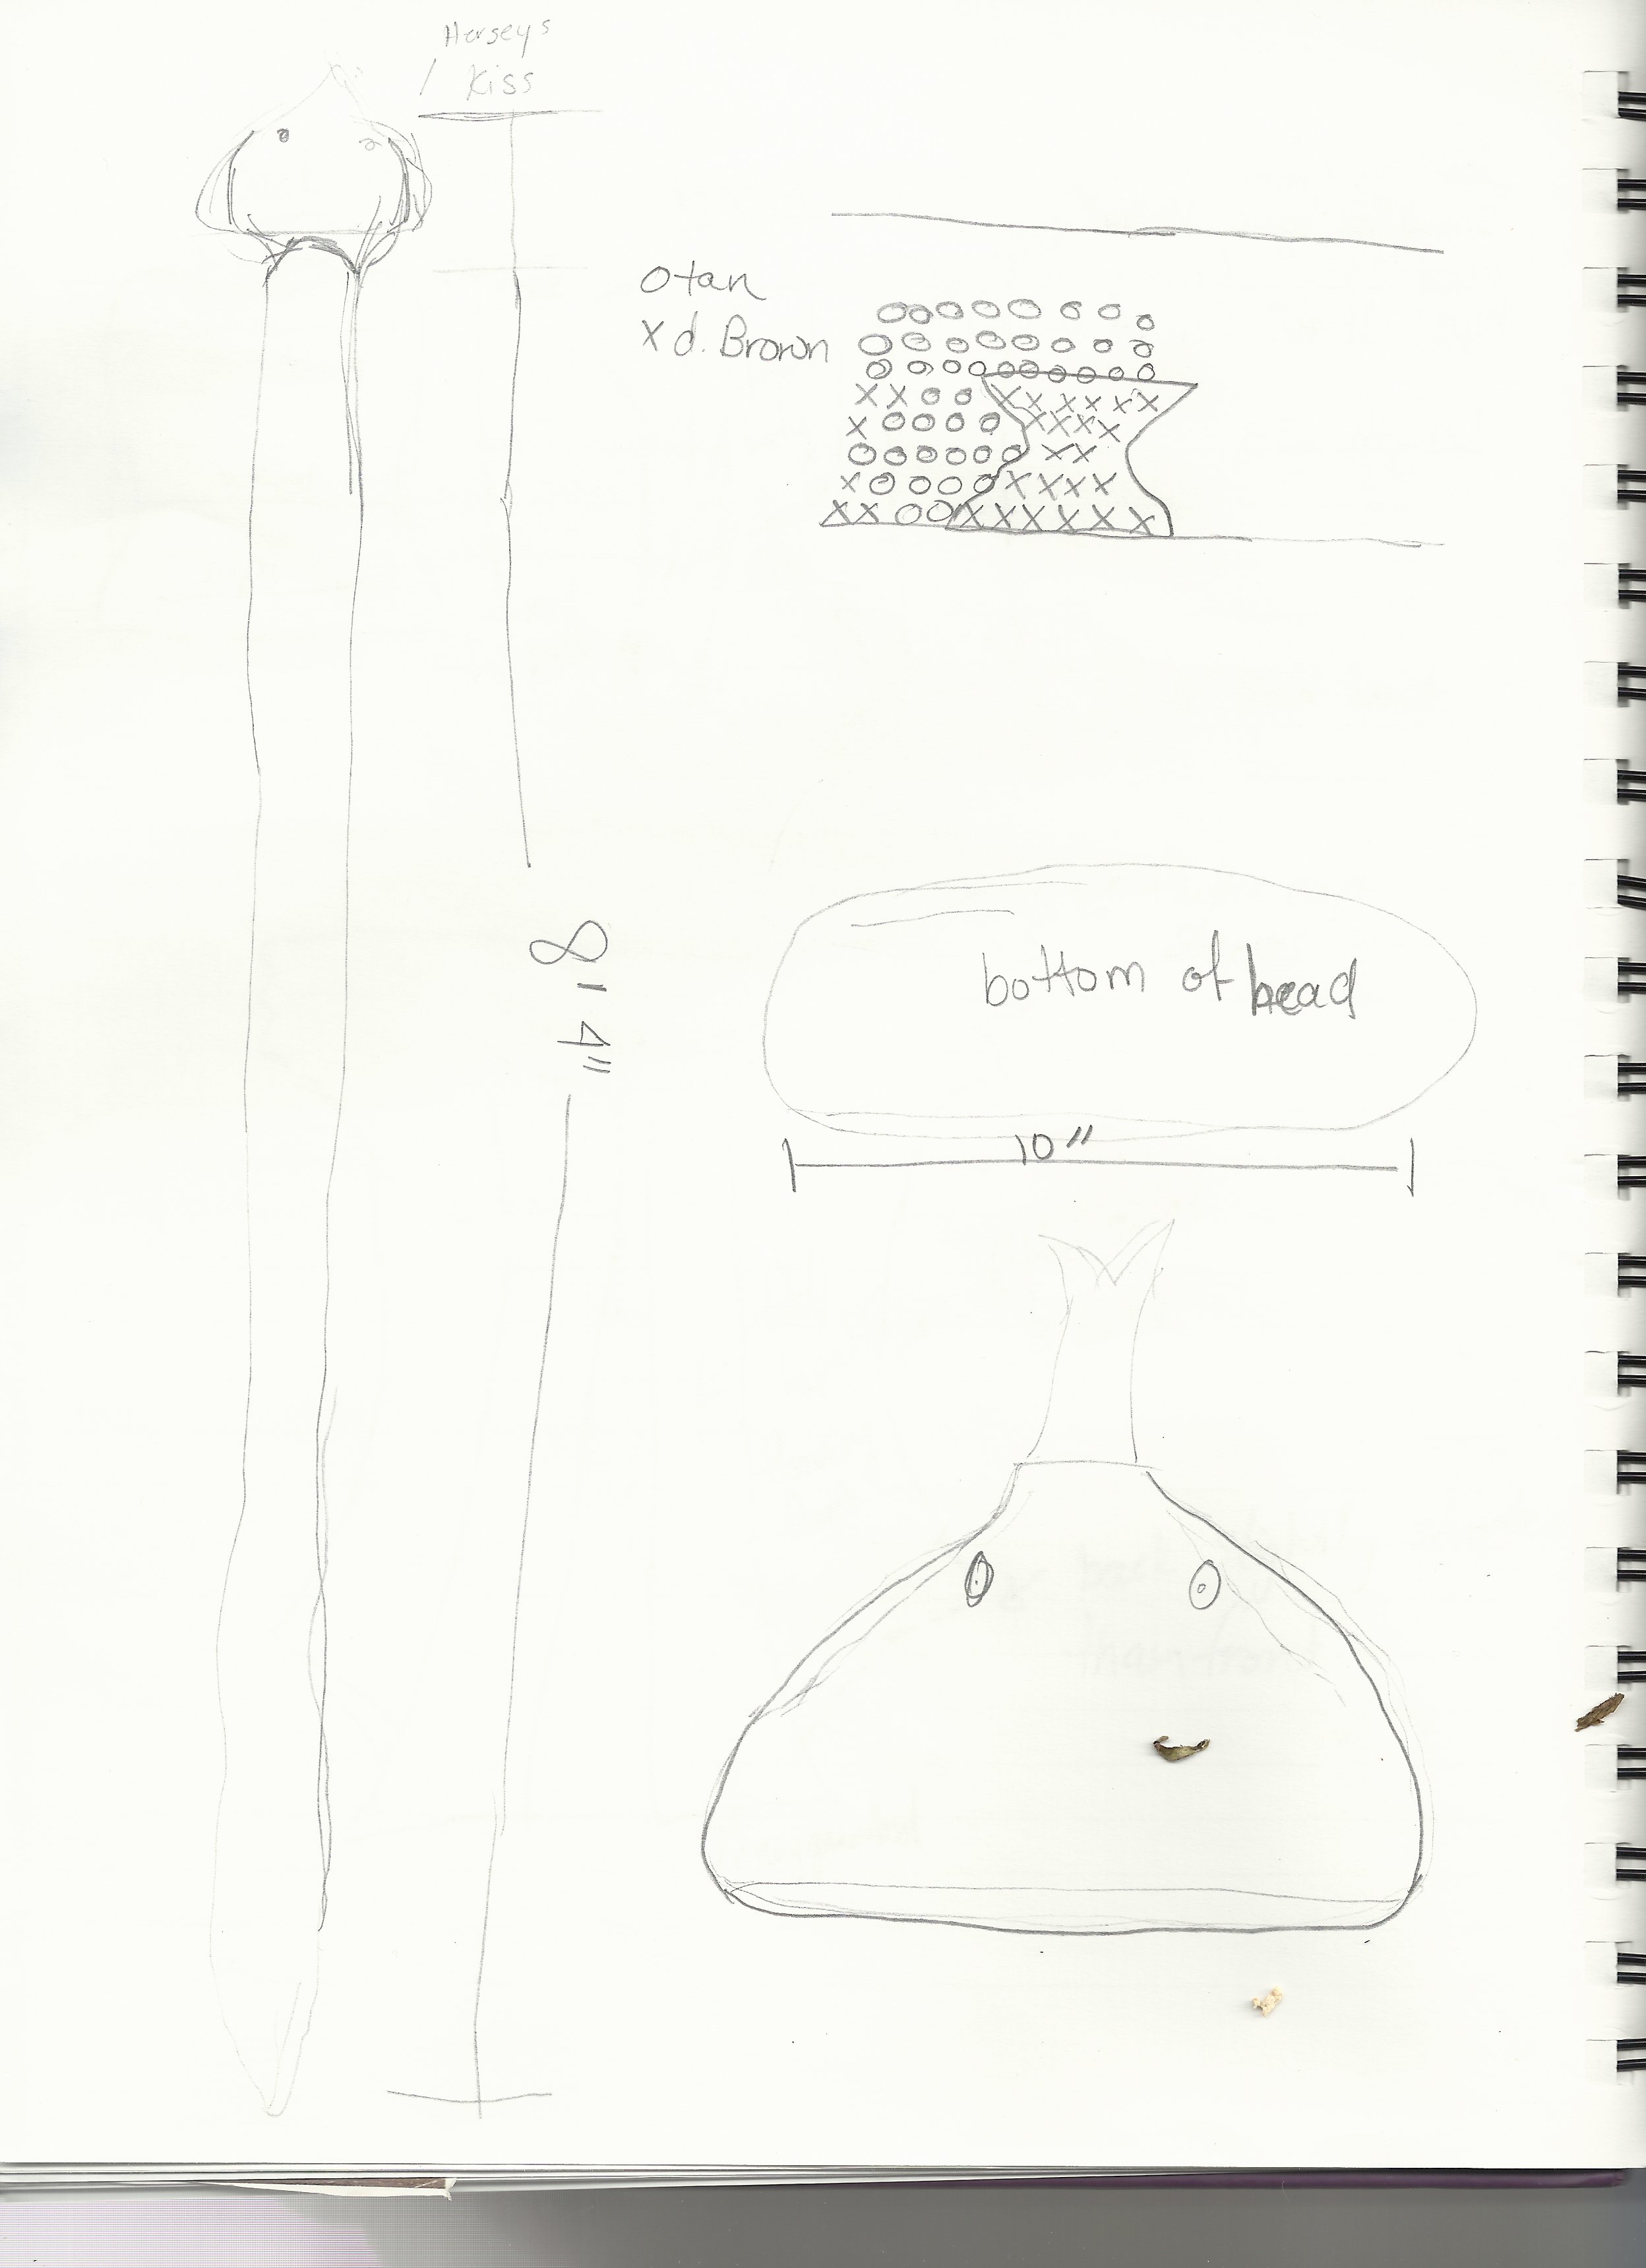
A really bad sketch of the door draft snake plan.
Once started with this crazy idea, I started to have fun with it. You see, the intial plan was to make a multi-coloured tube across the door out of my leftover yarn. It would have a dual purpose of using up bits and bobs of yarn while blocking the draft.
However, I’m not one to take the word “snake” lightly. A snake, you see, in my mind, should look like a snake. And, as I started pulling out yarn to plan that out, I found I had some left over fuzzy tan yarn that I made into the tail end. Then, I started with the idea that I like to make a challenge to increase my skills whenever I can. I wasn’t content to just strip colours, so I started to practise my tapestry techniques making hourglass shapes in dark brown. As I worked my way through it, I decided to give them a slight spiral hoping to make this tube not so boring.
A few rounds of motifs in, I showed it to my fiancé. My fiancé declared that it looked like a rattlesnake shaker, and from there the ideas started snowballing. It started with the rattle. After all, a proper rattlesnake needs a rattle. So, we made a rattle using a 50 mL centrifuge tube to which we added some sunflower seeds that weren’t able to be eaten (no seeds in the shells) and smaller cap from a 10 mL centrifuge tube. We sealed the 50 mL tube with a cap, then stuffed it into the tip of the tail.
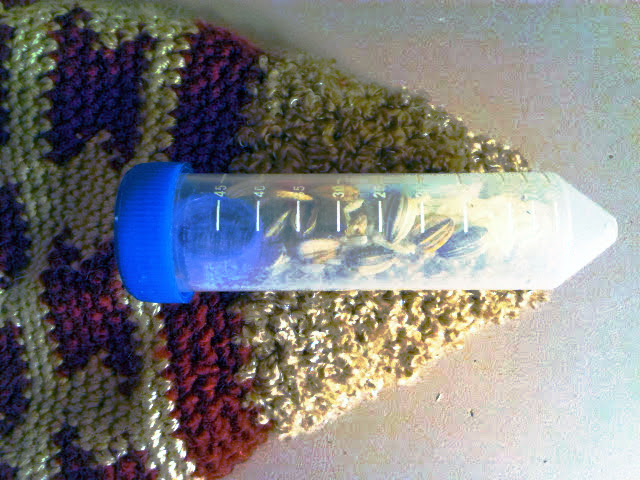
Please excuse the crappy picture. I couldn’t get the light right.
Once I got that stuffed in the snake, I began the long process of making the body. And, I do mean long. I worked on it for a few hours every night for nearly a month.
Granted, it probably would have gone a lot quicker if I hadn’t had to stuff the body with Poly-fil and rocks as I went. The rocks, by the way, were to keep the kittens from dragging it around the house. They doubled as a weight for my evening weight lifting sessions. This made turning the snake while I continued the rounds fairly annoying. In retrospect, I probably could have finished the body, then rolled it down to fill it after I was done. Maybe.
I would have also tried to find bigger eyes. As it was, I used the largest sized cat’s safety eyes I could find at our local JoAnn Fabrics. I don’t think it turned out too bad, though.
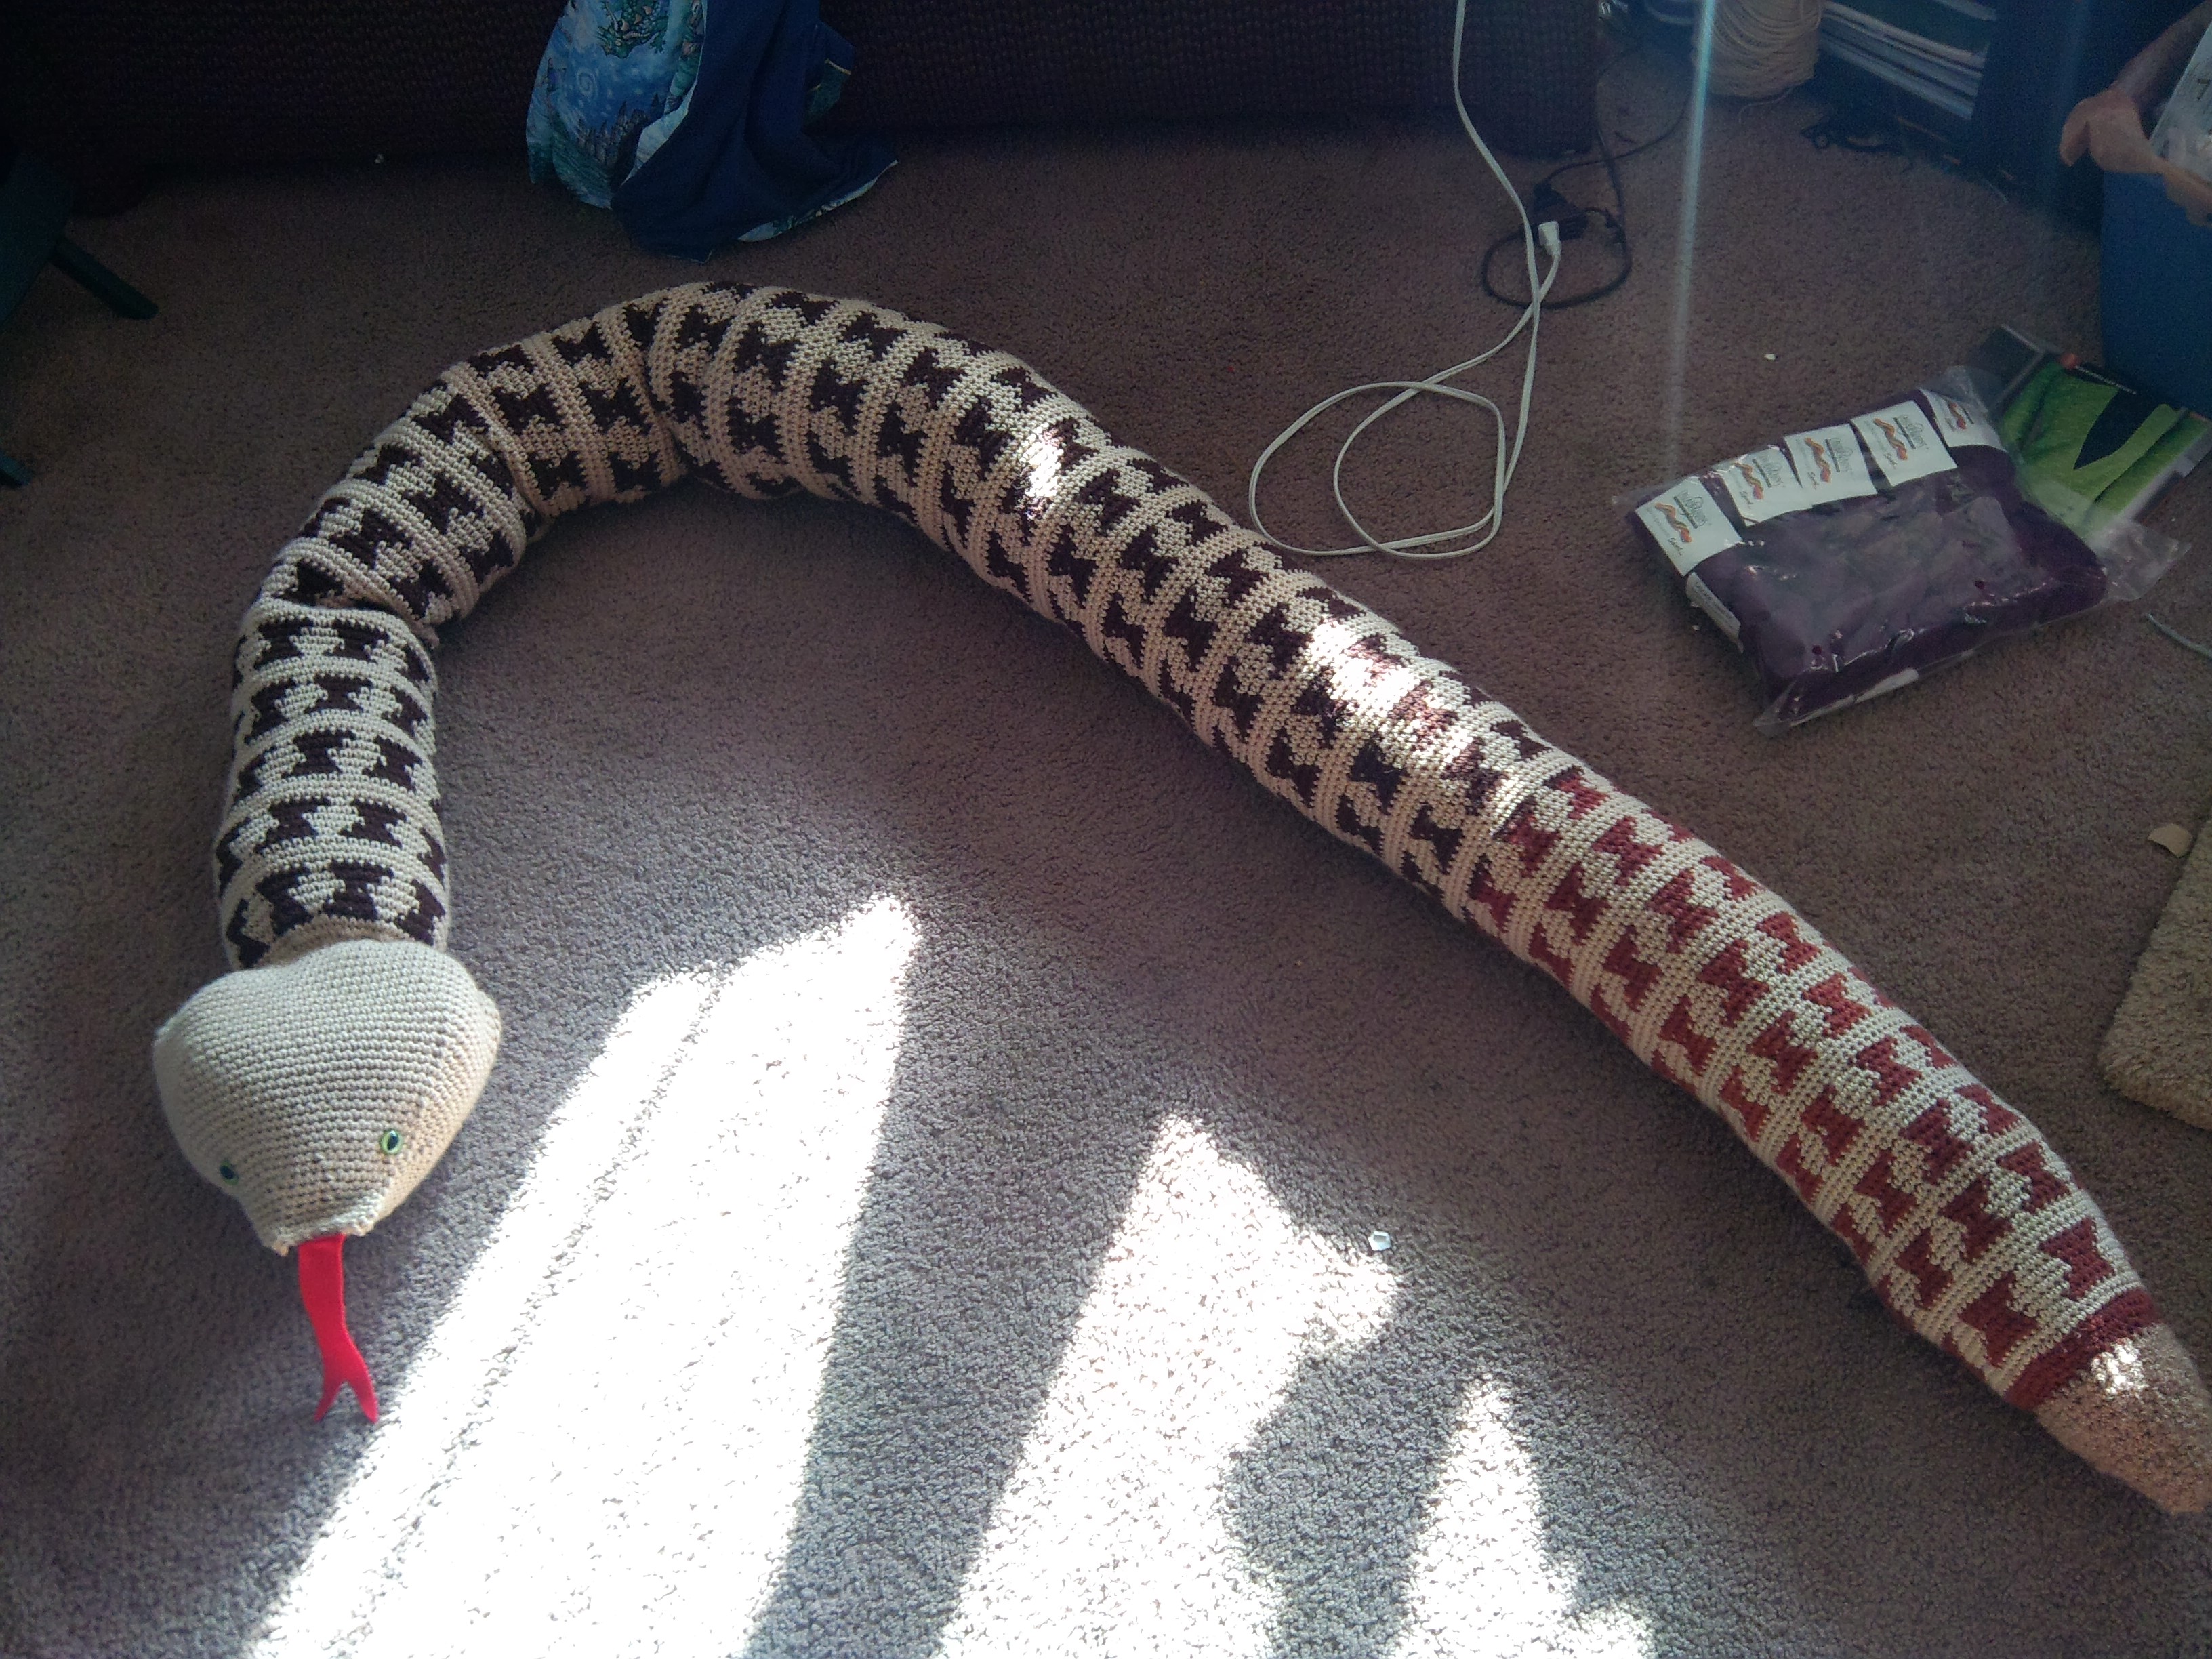
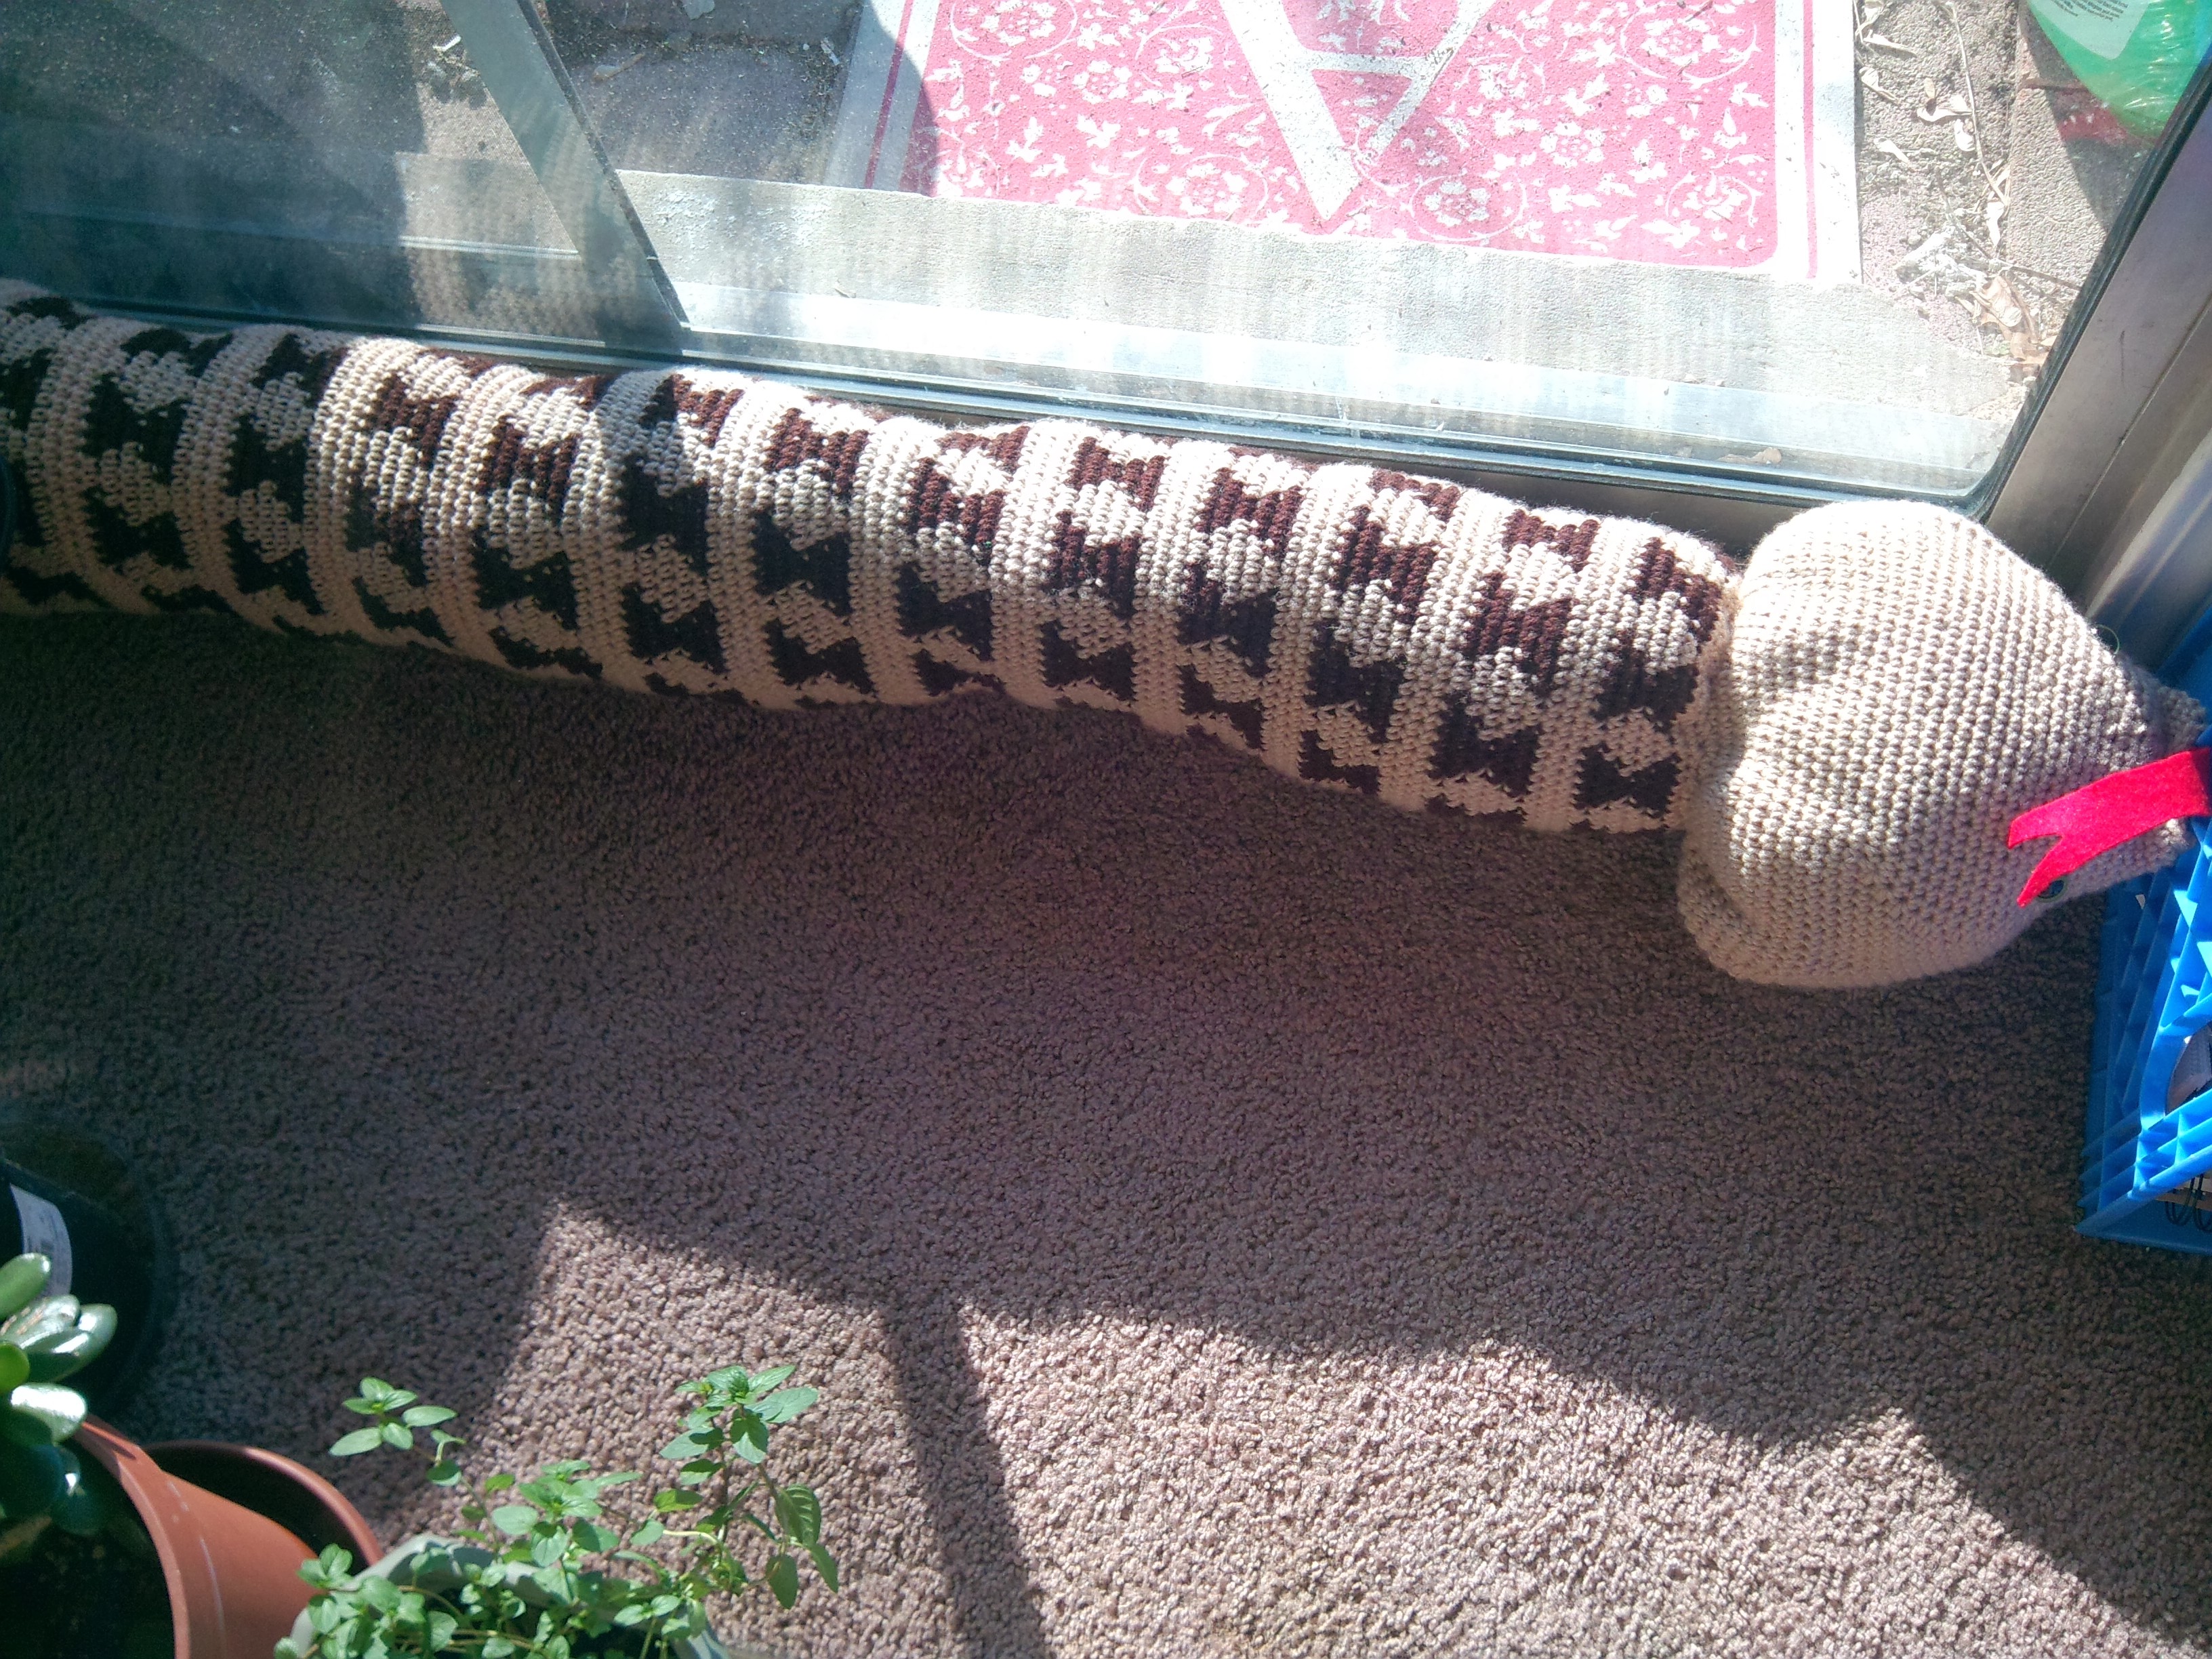
The 8 foot long draft snake.
These things are a lot of fun to make, and they are very useful. So, I’ve cleaned up my sketches to put a basic tutorial down as to how I pulled this monstrosity of a snake together.
First off, a little explanation about the diagrams below. I didn’t do my snake exactly as planned, but these measurements are what the engineer of the house came up with would be the best measurements for the most draft blockage. Travis decided that to have optimum draft blockage the snake should block the bottom and a few inches up the side of the door. The crocheter of the house looked at him like he was mad and went about doing it until she got fed up with it. Hence, the diagram you see the body indicates the length of the door, but the snake in the image you’ll see does not cover that length. I will agree with Trav on this one, having more length would do a better job of blocking the draft, but this one with just a few extra inches on one side works just dandy.
Now, your shopping list for this project is:
- 2.5 pounds of yarn in whatever colours you want (You’ll use about .5 lbs of dark brown and 1.25 lbs of tan if you do it like I did.)
- Something to make a rattle, or if you want to buy ones, you can try this: Rattle insert from American Felt and Crafts
- A full bag of Poly-fil… or two. It depends on how stiff you want to make it.
- Rocks or some other weight to hold it in place if you have kids or kittens (optional)
- Red felt for the tongue
- Very large cat’s eyes — bigger than 12mm (the size I used, which is too small)
- Tapestry needle
- Patience
Start your measurements. Here’s a handy graphic (my cleaned up sketches) to give you an idea of what you’ll need.
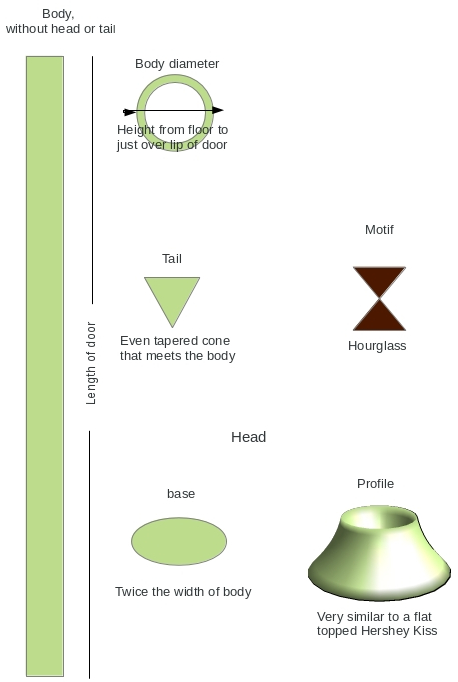
See, I can do this marginally better. 😉
Once you have these figured out, move onto to the tail. This is basically a cone that starts from the point and moves into the width you want it to be for the body. Mine was approximately 8ft long for the body, and about 12in for the diameter of the body. I used a 5.5mm hook and worsted weight (4) yarn from Caron yarns. This turned out to be 64 sc around with a fairly tight stitch at the beginning, which I loosened up slightly to give it a natural look of a snake’s taper.
Then, pick your motif. I used an hourglass shape with brown yarn so I could practise the tapestry technique. Because I had 64 sc, I used the following to make 8 motifs around:
Rnd 1: with brown 6 sc, switching to tan in the 6th sc, 2 sc with tan, switching back to brown in the last, sc repeat around
Rnd 2: with brown 4 sc, switching to tan in the 4th sc, 4 sc with tan, switching back to brown in the last sc, repeat around
Rnd 3: with brown 2 sc, switching to tan in the 2nd sc, 6sc with tan, switching back to brown in the last, sc repeat around
Rnd 4: with brown 4 sc, switching to tan in the 4th sc, 4 sc with tan, switching back to brown in the last sc, repeat around
Rnd 5: with brown 6 sc, switching to tan in the 6th sc, 2 sc with tan, switching back to brown in the last, sc repeat around
I separated each section of the hourglass motif with three rounds of tan.
Because you’re repeating the motif to the end of the body, make sure you like it! If if you are doing chevrons, twists, hourglasses, or other. Have fun because you’re going to be at this a while! Stuff as you with Poly-fill and weights as needed.
When you’ve got the body done, start decrease until you can close off the body. The head is done as a separate piece to look more like a real snake. And, you’ll have to play with this somewhat because I stumbled upon my method by accident. First, start making an ellipse (similar to a pair of baby booties) will eventually end up to be twice the width of the body. In the last few rounds, instead of increasing, stitch evenly. Then, put a marker in the points of the ellipsis (orange points in the diagram below). Then, move away from the marker in either direction, and mark the tangent line (blue dots in the diagram below).
Decreasing a Hersheys Kiss.
You’re going to decrease on each round between the blue dots. This will ensure that the head stays flat during the decrease and it also helps form those distinctive bulges on the snake head. To do this, focus on the bottom left blue dot for this explanation and think of it as your first stitch. Sc dc in that stitch, then sc around to the one before the next blue dot, sc dc in that and the blue dot. Sc from that dot to the next, sc dec in that dot and the NEXT stitch (inside the decrease area), sc until the sc before the blue dot, then sc dc in those two stitches. This should decrease the ellipsis curve very gradually so you have the beginnings of a Hershey Kiss shape. Keep going until the decreases meet up in the middle, approximately where at orange dot is.At this point, you should have a vaguely circular hole in the middle. Start stuffing so you can see the shape of the head. If you’re happy with the shape so far, just sc evenly for the beginning of the snout. After just a few rounds, place the eyes. Crochet a few more rounds decreasing occasionally as you go, but don’t go into a point. Instead, flat it out and sew it shut. you should have a truncated Hershey Kiss shape.
Note the vague Kiss shape? Could be a weird heart, though…
From here, all that’s left to do is cut out the forked tongue and sew it to the mouth seam. Now, you have a true draft snake! Enjoy your new pet. 🙂

Evil genius? Would have been if I’d actually thought to write a pattern as I went.
Have you done this project? I want to see your results and compare notes! What changes did you make? Did you write your own bit of pattern? How did you do the head? Share so we can come up with the door draft snake pattern for even newbies to follow.


